
How to record internal audio on a Mac, without an audio driver
Record the system audio of your Mac: one app, several apps or everything it plays. No audio driver, no virtual device, no microphone, and each song saved as its own file.
A Mac records its microphone without any help. Recording what the Mac itself plays, its internal audio, is another matter: a talk in a browser tab, a set in a music app, the sound of a video. For years that meant installing an audio driver, creating a virtual device, sending the sound through it and remembering to switch everything back afterwards.
Recent versions of macOS let an app record the sound of other apps directly, once you allow it. Tapelark is built on that. You choose what to record, press one button, and Tapelark saves the sound as named tracks in a library on your Mac. This guide shows each step.
Download TapelarkSee pricesFree for 14 days, every feature
What you need
- A Mac with macOS 14.4 or later, Apple silicon or Intel.
- Tapelark. The trial runs for 14 days with every feature and needs no account.
- Nothing else: no audio driver, no virtual device, no cable from the headphone jack to the microphone input, and no change to your sound settings.
Internal audio, system audio, app audio: what's the difference?
People use these words for the same thing: the sound the Mac plays, as opposed to the sound a microphone hears. Tapelark lets you choose how much of it to record.
- One app records a single app, for example your browser or your music player. A notification sound or a video call in another app doesn't end up in the recording.
- Several apps records the apps you tick, together.
- Whole system records everything this Mac plays, except Tapelark itself.
No microphone is involved, so room noise isn't in the recording.
Step 1: Install Tapelark and allow system audio recording
- Download Tapelark, open the disk image and move Tapelark to your Applications folder.
- Open it. The welcome guide explains, in six short steps, what Tapelark needs from macOS before macOS asks you.
- In the step Allow system audio recording, play a song in any app and click Test Recording. macOS asks whether Tapelark may record the audio of other apps: choose Allow. Tapelark records 2 seconds, checks that sound arrived and deletes the test at once.
- Click Start Using Tapelark.
This is the one permission recording needs. You can see its state at any time under Settings > Permissions.
Step 2: Choose what to record
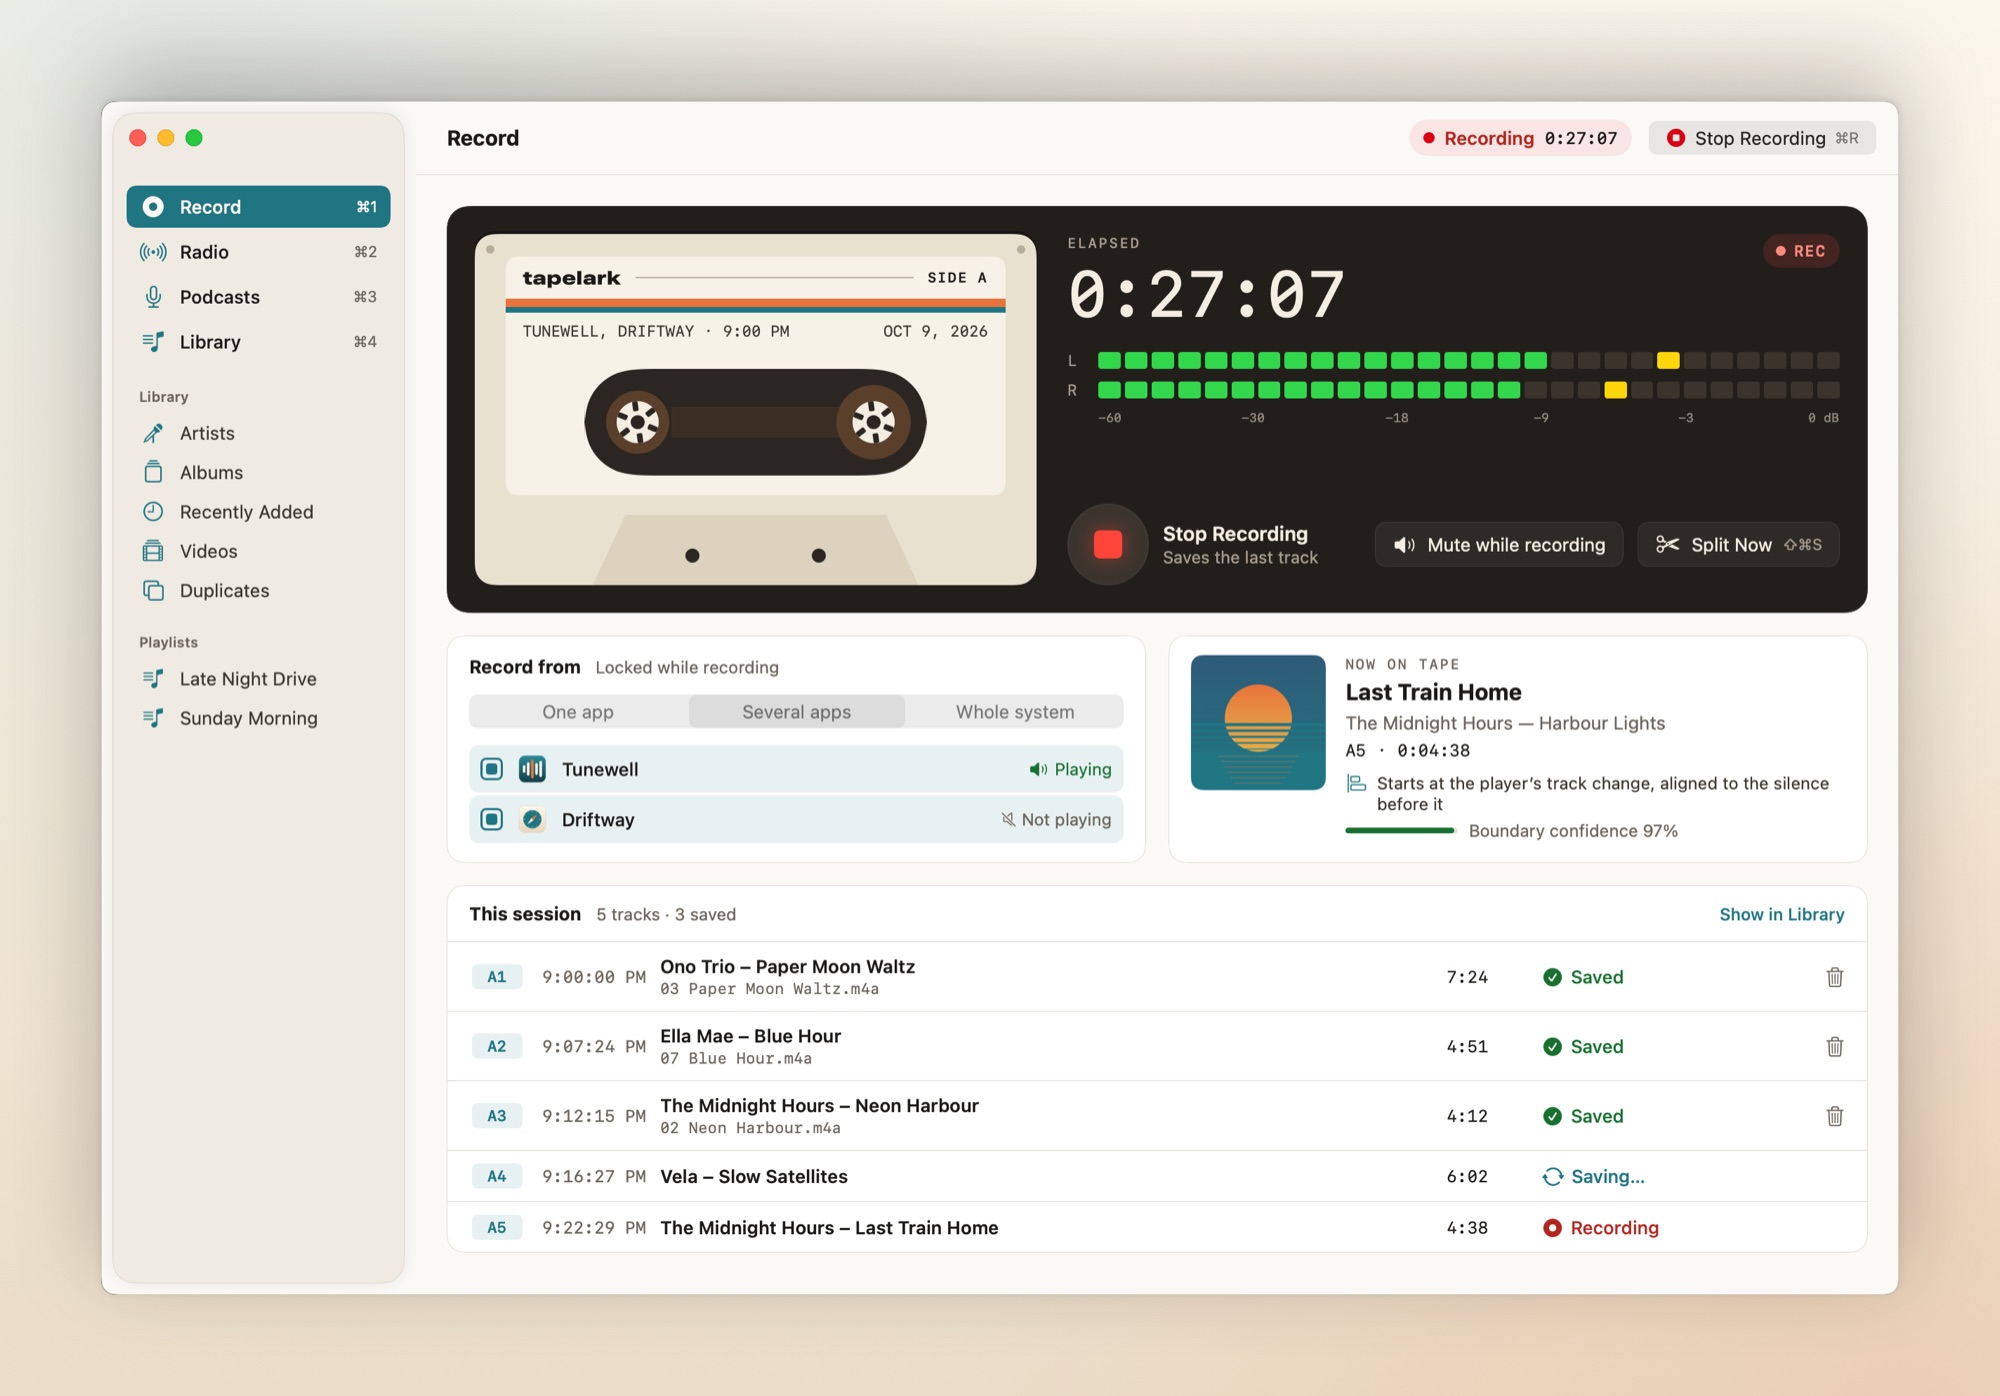
Start playback in the app you want to record. Then open Record in the sidebar (⌘1) and choose under Record from:
- One app, then the app in the list. The list shows the apps that are producing audio right now, with "Playing" next to those that play. If the app is missing, start playback in it and it appears.
- Several apps, then tick each one.
- Whole system, if you want everything.
To record a browser tab, choose the browser under One app. Tapelark records what the browser plays, so pause the other tabs that make sound.
Step 3: Press Start Recording
Click Start Recording, the round red button on the dark deck, or press ⌘R. The deck shows REC and the elapsed time, the level meters move with the sound, and Now on tape shows the track being recorded.
If you'd rather not hear what is being recorded, click Mute while recording on the deck. The apps fall silent on your Mac, and Tapelark still records them.
You can keep working or close the window: Tapelark keeps recording from the menu bar, where its icon turns into a red record symbol.
Step 4: Let Tapelark split the tracks
Tapelark splits a recording into tracks while it records, and saves each track as soon as it ends. You don't have to stop first. Each finished track appears under This session.
- When the player announces its songs, as the Music app and other supported players do, Tapelark cuts at the song change and gives each track its title and artist.
- When nothing announces the songs, as in a browser or with the whole system, it cuts at the short silence between two songs. Short pauses inside a song don't split it.
- Split Now (⇧⌘S) ends the current track at any moment and starts a new one.
Recording a talk, a lecture or a mix that should stay in one piece? Turn off Split recordings into tracks under Settings > Formats, and the recording is saved as one continuous file.
Step 5: Stop, and find your tracks in the Library
Click Stop Recording. The last track is saved within seconds. Open Library (⌘4) and choose Recently Added.
From here you can:
- Play a track with a double-click.
- Edit Tags… (⌘I) to name a track or add a cover.
- Trim… (⌥⌘T) the beginning or the end.
- Export… (⌘E) to a folder or a USB stick.
- Reveal in Finder (⇧⌘R) to see the files. They're ordinary audio files, by default in the Tapelark folder in your Music folder, and they're yours.
Recordings are saved as AAC, Apple Lossless or FLAC with tags and covers, or as WAV, which carries no tags. You choose the format under Settings > Formats.
Download TapelarkSee pricesNo driver to install, nothing to switch back
Recording internet radio? Use Radio instead
An internet station that you record as an app arrives as one long track, because its songs run into each other. Tapelark's Radio section (⌘2) records the station's own stream and saves one file per song when the station sends its titles. See How to record internet radio on your Mac.
If something doesn't work
The app is missing from the list. It isn't producing audio yet. Start playback in it and it appears.
"Only silence arrives although the app is playing, so System Audio Recording is probably not allowed for Tapelark." Open System Settings > Privacy & Security > Screen & System Audio Recording, turn Tapelark on under System Audio Recording Only, then quit and reopen Tapelark.
Everything ends up in one track. Nothing announced the songs, and there was no silence between them. Press Split Now at a song change, or cut the track in two afterwards with Split… in the Library.
The recording has a short gap. You changed the output device, for example by plugging in headphones. Tapelark reconnects and notes the gap in the track.
The recording stopped after 10 minutes. That's the limit until you buy Tapelark. A licence removes it.
What Tapelark won't record
Tapelark never gets around copy protection, and it never tries another way when something is protected. Recordings are for your own private listening: follow the terms of the services you use and the copyright law where you live. Tapelark can't upload, share or stream what you record. More about private use.
Need the picture too?
Tapelark Pro records one window's picture with its app's sound, with pause and resume. The free trial includes it. Protected video shows up black and can't be recorded.
What Tapelark costs
You can try Tapelark free for 14 days with every feature, with no account and no licence key. Until you buy, each recording stops after 10 minutes; after the trial Tapelark stays on as the free version with that limit, and everything you've recorded is yours to keep.
Buying is a one-time purchase with no subscription. One licence is for one person on all their Macs, and the key arrives by e-mail. You'll find the current prices on the Pricing page.
Want the short version? See Record audio from a browser tab or any app on your Mac. On Linux, see Record the sound of any app on Linux.
Ready when you are
Record what your Mac plays, today.
Tapelark is free for 14 days with every feature, with no account. Until you buy, each recording stops after 10 minutes, and everything recorded is yours to keep.